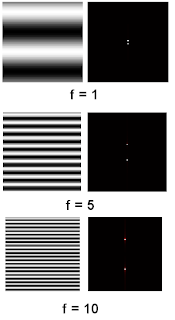
 As expected, the FT of a sinusoidal image is a dot since from the previous activity the FT of a sinusoidal function is a delta function. As we increase the frequency, the spacing between the sinusoidal image increase, this has the effect of increasing the spacing of the delta function in fourier space. Hence, we observe the dots move apart as we increase frequency.
The next part of the activity is we tried to rotate the sinusoid by a factor of theta using the following formula:

 Rotating the sinusoid in has the effect of rotating its fourier transform in the clockwise direction.
Multiplication of two sinusoids produces a checkerboard image while its fourier transform are 4 dots along the edges:

The next objective is to enhance the appearance of the ridges of a fingerprint to enhance its appearance. The image I used is from the activity 7 manual, the original image, enhanced image the FT of the original image and the filter is shown below:

I chose to design the filter to mimic the fourier transform of the original image, I saved the FT of the original image then edited its contrast/brightness using GIMP. Convolving this filter with the original image would result in the removal of unwanted frequencies of the image. The resulted in an improved image of the fingerprint whose ridges are more clear than the original image. Also I noticed that discontinuities in the original image was removed after applying the filter.
The code that I used is given below:
-------------------------------------------------------------------------------------
I = imread("C:\Documents and Settings\semicon\Desktop\activity7\final\sample.bmp");
I2 = im2gray(I);
C = imread("C:\Documents and Settings\semicon\Desktop\activity7\final\ft.bmp");
C = im2gray(C);
Cshift = fftshift(C);
ftI = fft2(I2);
conv = Cshift.*ftI;
iconv = fft2(conv);
scf(0);imshow(I2,[]);
scf(1);imshow((abs(fft2(fft2(iconv)))),[]);
scf(2);imshow(log(fftshift(abs(ftI))), []);
xset("colormap",hotcolormap(256))
//imwrite(log(fftshift(abs(ftI)))/max(log(fftshift(abs(ftI)))), "C:\Documents and Settings\semicon\Desktop\activity7\final\ft.bmp");
//imwrite(abs(fft2(fft2(iconv)))/max(abs(fft2(fft2(iconv)))), "C:\Users\RAFAEL JACULBIA\Documents\subjects\186\activity7\final\hiRes.bmp");
----------------------------------------------------------------------------------
The next part of the activity aims to remove the vertical lines of an image of the moon's surface. For faster calculations, I resized the image to 270x203 pixels keeping the aspect ratio constant.
The original image, the improved image, the FT of the original image and the Filter used is shown below:

Saving the FT of the original image and adjusting it seems to be not working in this particular image so I tried to just mimic the FT instead of really editing it. It can be seen that the vertical lines of the original image is not visible anymore.
I will give myself a grade of 10 for this activity because the primary objectives were met. So far this activity seems to be the hardest for me, maybe because I am not really sure if I understand the method to be used.
Thanks to the following for helping me in this activity
Eduardo David
Elizabeth Ann Prieto
Jorge Michael Presto
4 comments:
From your report, it is not clear to me what you did with the filter and why that particular filter design. Could you fill in the details before I agree to a 10.
Although I must say that the trick with the fingerprint is clever - first time to hear about using intensity correction on the Fourier Transform instead of filtering. But how were you able to do it when the Fourier Transform is actually a complex field? Did you perform it in the intensity image of the FT?
for the fingerprint, what I did was to save the intensity of the Fourier Transform of the Image and edited its contrast/brightness using GIMP. This new "edited" fourier transform is the Filter that I used instead of using other shapes.
For the high resolution image, at first I tried again "editing" the Fourier transform using GIMP similar to what I did for the fingerprint. However, this did not work so I decided to just mask the parts of the Fourier transform where intense peaks occur. Since the original Fourier transform of the Image has a general shape of a cross with a hole in the middle, I used that as my Filter.
Post a Comment